vcpkg指南
vcpkg指南
本文介绍 Windows 下比较方便的 C++ 包管理程序。
vcpkg
1 网址
- 官方网址:https://vcpkg.io/en/index.html
- 开源网址:https://github.com/microsoft/vcpkg
2 介绍
本文档都是基于 GitHub 文档 https://github.com/microsoft/vcpkg/blob/master/docs/README.md 进行介绍。
2.1 基本信息
vcpkg提供对其支持的平台的C和C++库的访问。命令行实用程序目前在Windows、macOS和Linux上可用。vcpkg首次在CppCon 2016上宣布。vcpkg源代码在MIT License下获得许可并托管在GitHub上。vcpkg支持Visual Studio 2015 Update 3及更高版本。
2.2 Windows 安装
前置条件:
- Windows 7 或更新的版本
- Git
- Visual Studio 2015 Update 3 或更新的版本(包含英文语言包)
2.2.1 克隆到本地
首先,请使用 git clone vcpkg 。 您可以将 vcpkg 安装在任何地方,但是通常我们建议您使用 vcpkg 作为 CMake 项目的子模块,并将其全局安装到 Visual Studio 项目中。 我们建议您使用例如 C:\src\vcpkg 或 C:\dev\vcpkg 的安装目录,否则您可能遇到某些库构建系统的路径问题。
1
git clone https://github.com/microsoft/vcpkg
2.2.2 执行脚本
执行 bootstrap-vcpkg.bat 脚本,主要是生成 vcpkg.exe 可执行程序。
1
2
3
4
5
.\vcpkg\bootstrap-vcpkg.bat

# 或者
cd vcpkg
bootstrap-vcpkg.bat
3 使用
本人使用路径是 C:\dev\vcpkg
3.1 添加环境变量(可选)
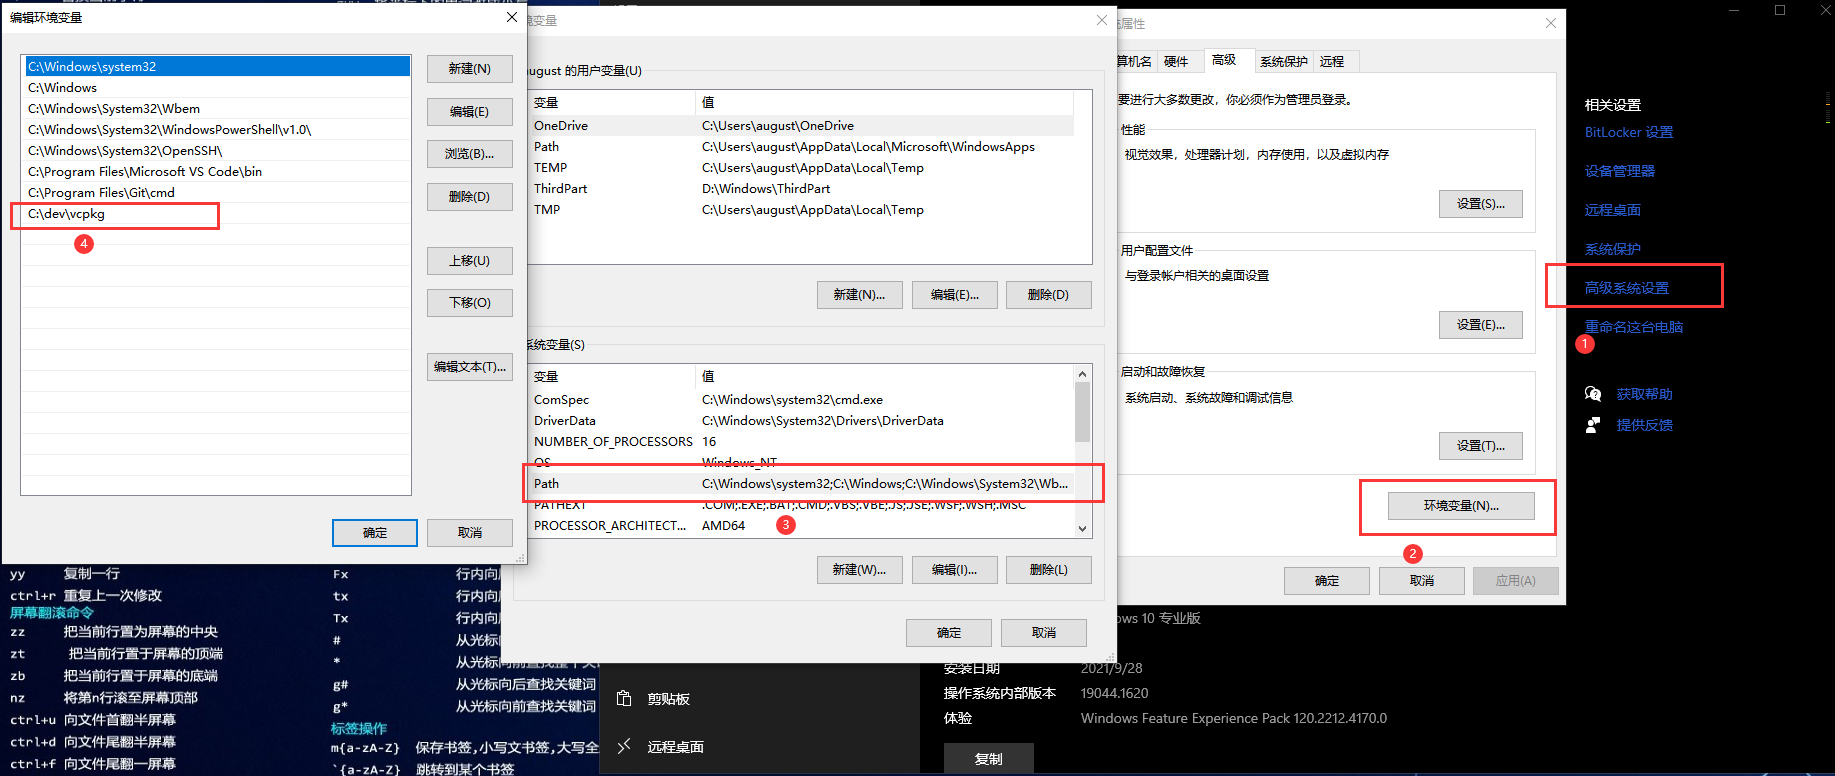
如果想在 cmd 或 powershell 任意地方使用,建议添加在环境变量中。
此电脑=》属性=》高级系统设置=》环境变量=》Path
3.2 vcpkg命令
1
2
3
4
5
6
7
8
9
10
11
12
13
14
15
16
17
18
19
20
21
22
23
24
25
26
27
28
29
30
31
32
33
34
35
36
37
38
39
40
41
42
43
44
45
46
47
48
49
50
51
52
53
54
55
Commands:
  vcpkg search [pat]              查找可以安装的软件包
  vcpkg install <pkg>...          安装软件包
  vcpkg remove <pkg>...           卸载软件包
  vcpkg remove --outdated         卸载过期的软件包
  vcpkg list                      显示已安装的软件包
  vcpkg update                    更新软件包
  vcpkg upgrade                   升级重建所有过时的软件包
  vcpkg x-history <pkg>           显示软件包的控制版本的历史记录
  vcpkg hash <file> [alg]         HASH查看文件,默认为SHA512
  vcpkg help topics               显示帮助主题列表
  vcpkg help <topic>              显示特定主题的帮助

  vcpkg integrate install         使安装的软件包在用户范围内可用。需要管理员(Visual Studio使用)

  vcpkg integrate remove          删除用户范围的权限
  vcpkg integrate project         生成一个参考软件包,供个人和VS项目使用
  vcpkg integrate powershell      给powershell授予权限

  vcpkg export <pkg>... [opt]...  导出一个软件包
  vcpkg edit <pkg>                编辑软件包
  vcpkg create <pkg> <url> [archivename]
                                  创建一个新包
  vcpkg x-init-registry <path>    初始化目录
  vcpkg format-manifest --all     Formats all vcpkg.json files. Run this before committing to vcpkg.
  vcpkg owns <pat>                搜索已安装软件包中的文件
  vcpkg depend-info <pkg>...      显示包的依赖项列表
  vcpkg env                       为开发或编译创建一个干净的shell环境
  vcpkg version                   显示版本信息
  vcpkg contact                   显示联系人信息以发送反馈

Options:
  --triplet=<t>                   Specify the target architecture triplet. See 'vcpkg help triplet'
                                  (default: %VCPKG_DEFAULT_TRIPLET%)
  --host-triplet=<t>              Specify the host architecture triplet. See 'vcpkg help triplet'
                                  (default: %VCPKG_DEFAULT_HOST_TRIPLET%)
  --overlay-ports=<path>          Specify directories to be used when searching for ports
                                  (also: %VCPKG_OVERLAY_PORTS%)
  --overlay-triplets=<path>       Specify directories containing triplets files
                                  (also: %VCPKG_OVERLAY_TRIPLETS%)
  --binarysource=<path>           Add sources for binary caching. See 'vcpkg help binarycaching'
  --x-asset-sources=<path>        Add sources for asset caching. See 'vcpkg help assetcaching'
  --downloads-root=<path>         指定vcpkg下载目录
                                  (default: %VCPKG_DOWNLOADS%)
  --vcpkg-root=<path>             指定vcpkg根目录
                                  (default: %VCPKG_ROOT%)
  --x-buildtrees-root=<path>      (测试)指定buildtrees根目录
  --x-install-root=<path>         (测试)指定安装根目录
  --x-packages-root=<path>        (测试)指定包的根目录
  --x-json                        (测试)请求JSON输出

  @response_file                  指定响应文件以提供其他参数

For more help (including examples) see the accompanying README.md and docs folder.
3.3 设置VS使用(推荐)
若您希望在 Visual Studio 中使用vcpkg,请运行以下命令 (可能需要管理员权限)
1
vcpkg integrate install
在此之后,您可以创建一个非cmake项目 (或打开已有的项目)。 在您的项目中,所有已安装的库均可立即使用 #include 包含您需使用的库的头文件且无需额外配置。
3.4 命令使用(常用)
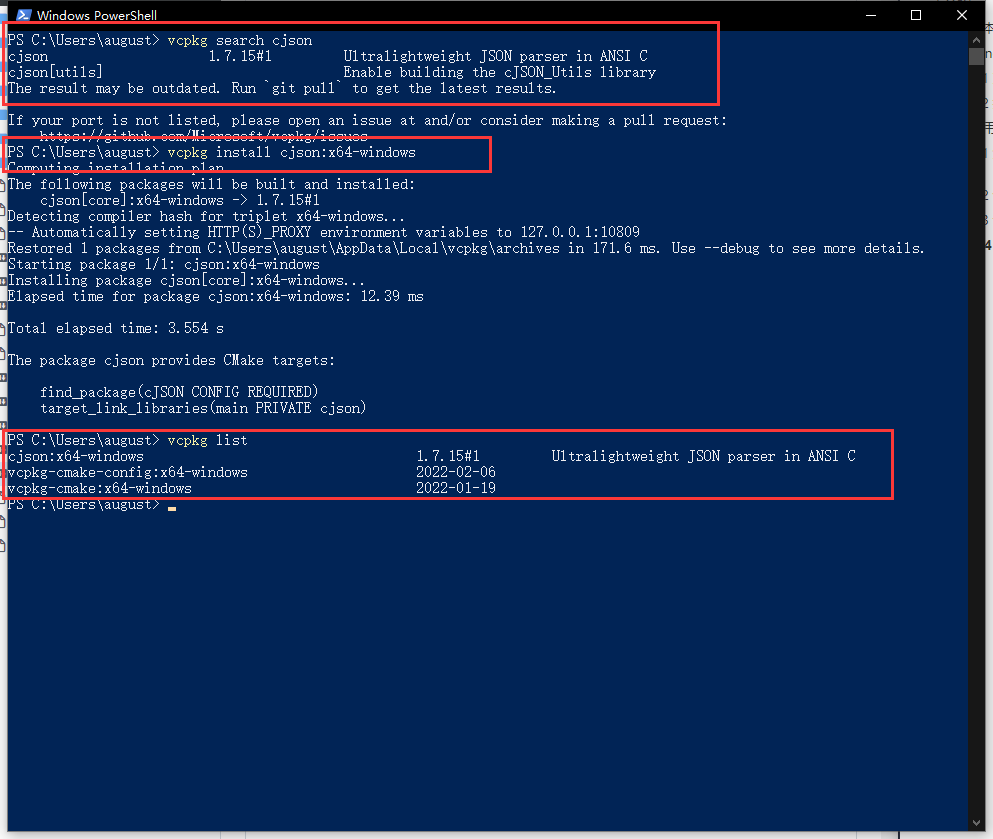
以 cjson 三方库为例
- 查看官方库里是否有三方库,可以看到目前是
1.7.15版本
1
vcpkg search cjson
- 安装
cjson
请注意: vcpkg在Windows中默认编译并安装x86版本的库。
1
2
3
4
5
6
7
# 这是默认安装32位版本
vcpkg install cjson

# 若要编译并安装x64版本,请执行:
vcpkg install cjson:x64-windows
# 或
vcpkg install cjson --triplet=x64-windows
- 查看安装软件列表
1
vcpkg list
- 卸载安装包
卸载同安装
1
vcpkg remove cjson:x64-windows
3.5 VS使用软件包
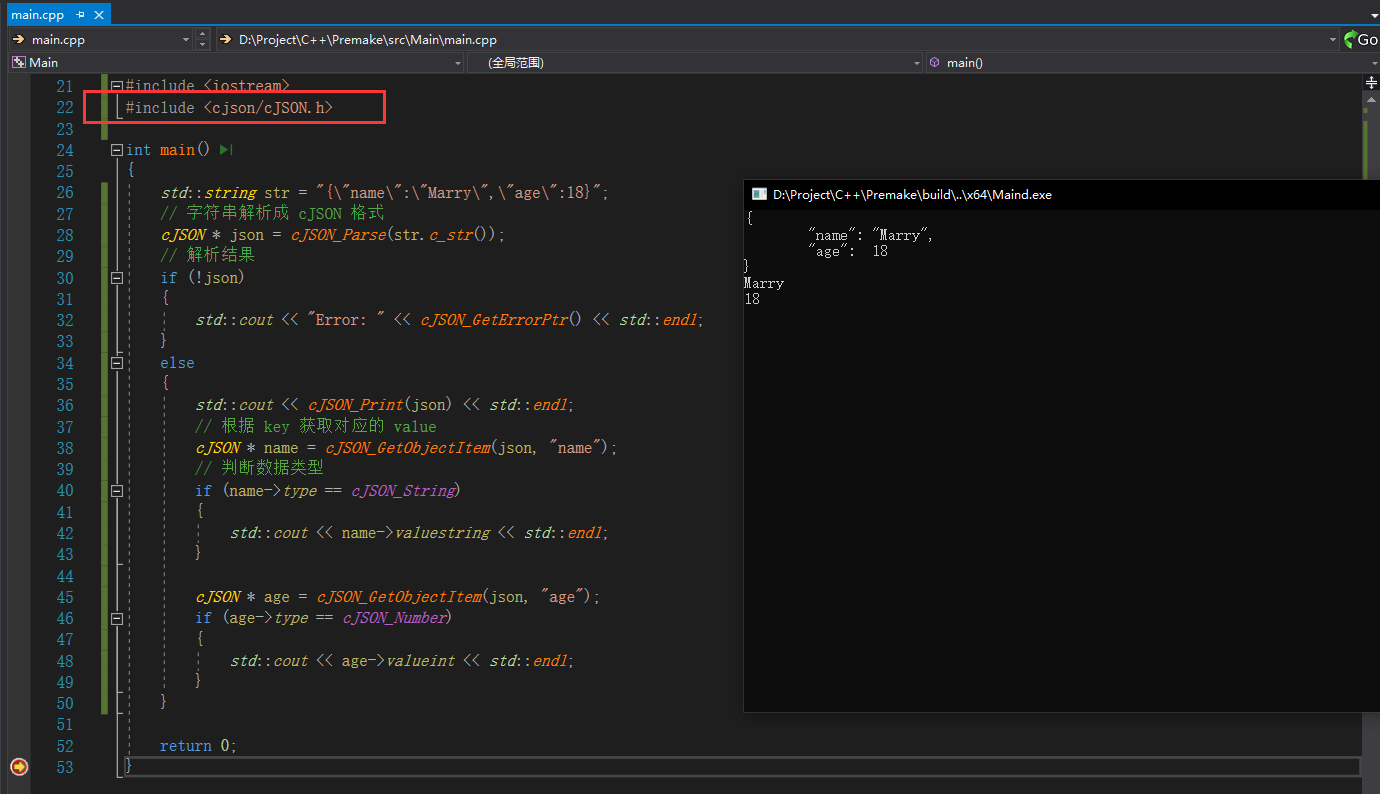
直接在 VS 中使用即可(在VS2017中测试)
1
2
3
4
5
6
7
8
9
10
11
12
13
14
15
16
17
18
19
20
21
22
23
24
25
26
27
28
29
30
31
32
33
#include <iostream>
#include <cjson/cJSON.h>

int main()
{
	std::string str = "{\"name\":\"Marry\",\"age\":18}";
	// 字符串解析成 cJSON 格式
	cJSON * json = cJSON_Parse(str.c_str());
	// 解析结果
	if (!json)
	{
		std::cout << "Error: " << cJSON_GetErrorPtr() << std::endl;
	}
	else
	{
		std::cout << cJSON_Print(json) << std::endl;
		// 根据 key 获取对应的 value
		cJSON * name = cJSON_GetObjectItem(json, "name");
		// 判断数据类型
		if (name->type == cJSON_String)
		{
			std::cout << name->valuestring << std::endl;
		}

		cJSON * age = cJSON_GetObjectItem(json, "age");
		if (age->type == cJSON_Number)
		{
			std::cout << age->valueint << std::endl;
		}
	}

	return 0;
}
本文由作者按照 CC BY 4.0 进行授权


